Resetting a coolant temperature sensor involves clearing its stored data to recalibrate temperature readings. This process helps ensure accurate engine temperature monitoring for optimal vehicle performance.
Unlock the secrets to smooth engine performance with ourEasy Guide on How to Reset Coolant Temp Sensor! Learn the ropes in just a few steps and say goodbye to temperature glitches. Revitalize your ride effortlessly and keep your engine running at its best with our straightforward instructions. Discover the simplicity of resetting your shortcut to a well-calibrated coolant temperature sensor!
Mastering the reset of your coolant temp sensor is a breeze with our Easy Guide. Follow a few simple steps to recalibrate and optimize your engine’s performance. Our guide provides clear instructions making the process quick and hassle-free. Ensure your vehicle runs smoothly with this straightforward solution.
What’s the Coolant Temp Sensor?
The Coolant Temp Sensor is a small device in your car that keeps track of the temperature of the engine coolant. It’s like a tiny thermometer for your car’s engine. When you start your car the sensor measures how hot or cold the coolant is and sends this information to the engine control module.
The engine control module uses the data from the Coolant Temp Sensor to make sure the engine is running at the right temperature. If the engine gets too hot the module might adjust things like the fuel injection to cool it down.
If it’s too cold, the module may increase fuel delivery to warm things up. In short the Coolant Temp Sensor helps your car’s engine stay in the Goldilocks zone not too hot not too cold but just right for optimal performance and efficiency.
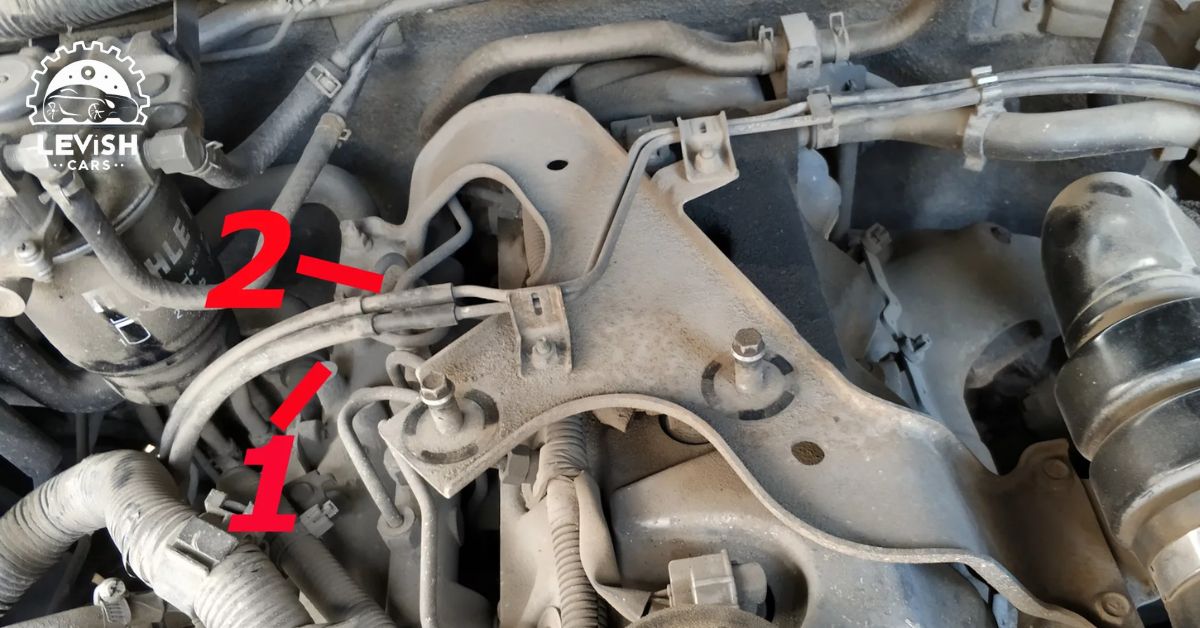
Where Is the Coolant Temp Sensor Located?

The coolant temperature sensor is typically located near the engine in a car. Look for it on or around the engine block close to the thermostat housing. It may also be positioned near the cylinder head or on the intake manifold.
The sensor is crucial for monitoring the temperature of the engine coolant providing information to the engine control unit (ECU) to ensure optimal performance and fuel efficiency.
To find the exact location of the coolant temperature sensor in your vehicle refer to the car’s manual or consult online resources specific to your make and model. Keep in mind that the sensor’s placement can vary between different car brands and models.
If you’re unsure seek professional help or ask for guidance from experienced mechanics to locate and replace the coolant temperature sensor accurately.
What Is the Function of a Coolant Temperature Sensor?
The coolant temperature sensor monitors the temperature of your car’s engine. It helps regulate the engine’s operating temperature. If the engine gets too hot or too cold the sensor sends signals to the engine control unit.
Information guides the ECU in adjusting fuel injection and ignition timing for optimal performance. Proper coolant temperature is crucial for engine efficiency and longevity. If the sensor malfunctions it can lead to poor fuel economy increased emissions or engine damage.
Regular maintenance and timely sensor replacement are essential for a well-functioning vehicle.
What Are the Various Types of Coolant Temperature Sensors?
| Sensor Type | Description |
| Thermistor | Measures temperature using changes in resistance |
| Thermocouple | Generates voltage based on temperature difference |
| Infrared Sensors | Detects temperature by measuring infrared radiation |
| Hall Effect Sensors | Utilizes magnetic fields to measure temperature |
| Gas Temperature Sensors | Monitors gas temperature in specific applications |
| Liquid Temperature Sensors | Measures temperature of liquids |
| Digital Temperature Sensors | Provides digital temperature readings |
Note:
This is a simplified table with brief information about various types of coolant temperature sensors.
What Happens if the Coolant Temperature Sensor Is Bad?
If the coolant temperature sensor is bad it can cause problems for your car. This sensor helps regulate the engine temperature by sending signals to the engine control unit (ECU). If it fails the ECU may receive inaccurate temperature readings leading to issues like poor fuel efficiency difficulty starting the engine or even engine overheating.
A faulty coolant temperature sensor can affect the vehicle’s emissions control system. Incorrect temperature readings may cause the engine to run rich or lean resulting in increased emissions and potential damage to the catalytic converter.
It’s important to address a bad coolant temperature sensor promptly to ensure proper engine performance and prevent further damage to your car.
Overheating Engine
An overheating engine can lead to serious damage. Common causes include low coolant a faulty thermostat or a malfunctioning water pump. If the temperature gauge rises, pull over and turn off the engine to prevent damage.
Check coolant levels radiator and hoses but seek professional help for proper diagnosis and repairs. Ignoring an overheating engine can result in costly damage and compromise the vehicle’s performance.
Poor Fuel Economy
Poor fuel economy in your vehicle can be caused by various factors. One common reason is improper tire pressure as underinflated tires can increase rolling resistance. Dirty air filters and clogged fuel injectors may also reduce fuel efficiency.
Inefficient driving habits such as aggressive acceleration and excessive idling, can contribute to poor mileage. A malfunctioning oxygen sensor or a faulty spark plug may further impact fuel economy. Regular maintenance proper tire inflation and addressing engine issues promptly can help improve your vehicle’s fuel efficiency.
Check Engine Light Turns On
When your check engine light turns on, it indicates a potential issue with your vehicle. It could be caused by something as simple as a loose gas cap or a more complex problem like a malfunctioning sensor or an issue with the engine’s components. Ignoring the check engine light can lead to more severe problems and may affect your vehicle’s performance.
To determine the cause use an OBD-II scanner to retrieve error codes from the vehicle’s onboard computer. While a loose gas cap may be an easy fix other issues may require professional attention. Promptly addressing the check engine light can prevent further damage, ensure optimal performance and may save you from more costly repairs in the long run.
Black Smoke Emitted from the Exhaust
If black smoke is coming from your vehicle’s exhaust it indicates a potential problem with the combustion process. This dark smoke is often a sign of a rich air-fuel mixture meaning there is too much fuel and not enough air being burned in the engine.
Possible causes of black smoke include a clogged air filter a malfunctioning fuel injector a faulty oxygen sensor or issues with the fuel pressure regulator. Problems with the ignition system or a dirty mass airflow sensor can contribute to this issue.
Addressing the root cause of the black smoke is crucial to prevent further damage to the engine and to improve fuel efficiency. Consulting with a professional mechanic and conducting a thorough inspection can help identify and resolve the specific issue causing the excessive fuel in the combustion process.
Intermittent Misfires
Intermittent misfires in your vehicle can be a result of various issues affecting the engine’s performance. Misfires occur when there is a failure in the combustion process of one or more cylinders.
Possible causes of intermittent misfires include faulty spark plugs damaged ignition coils a clogged fuel injector or issues with the engine control module. Vacuum leaks problems with the air intake system or a malfunctioning mass airflow sensor can also contribute to misfires.
It’s essential to address intermittent misfires promptly to prevent damage to the catalytic converter and other engine components.
Diagnosing the specific cause often requires professional assistance, as it may involve a comprehensive inspection testing of ignition components and checking fuel delivery systems. Regular maintenance and addressing issues promptly can help maintain optimal engine performance.
Coolant Temperature Gauge Fluctuations
Fluctuations in the coolant temperature gauge can signal potential issues with the cooling system of your vehicle. These fluctuations may be caused by a faulty thermostat air bubbles in the coolant a malfunctioning coolant temperature sensor or a problem with the radiator or water pump.
A stuck thermostat can lead to irregular temperature readings while air pockets in the coolant can disrupt the proper flow and temperature regulation. A malfunctioning coolant temperature sensor might provide inaccurate data to the gauge. Issues with the radiator or water pump can affect the cooling system’s efficiency.
If you notice unusual fluctuations in the coolant temperature gauge it’s advisable to have your vehicle inspected by a professional mechanic. Timely diagnosis and repair can prevent overheating and potential damage to the engine ensuring the reliable performance of your vehicle.
Engine Running Rough
If your engine is running rough it indicates a problem with its smooth operation. Common causes for a rough-running engine include issues with spark plugs ignition coils fuel injectors or the air and fuel mixture.
Faulty spark plugs or ignition coils can lead to misfires causing the engine to run unevenly. Clogged or malfunctioning fuel injectors may disrupt the proper fuel distribution. Problems with the air intake system or a dirty air filter can affect the air-fuel mixture.
Regular maintenance including replacing spark plugs and air filters can improve engine performance. However if the rough running persists it’s crucial to have a professional mechanic diagnose and address the underlying issue preventing potential damage and ensuring the engine operates smoothly.
Engine Stalls
Engine stalls can occur for various reasons and addressing the underlying issues is important for reliable vehicle operation. Common causes of engine stalls include:
- Fuel System Issues: Problems with the fuel system such as a clogged fuel filter malfunctioning fuel pump or issues with fuel injectors can lead to inadequate fuel delivery and cause the engine to stall.
- Ignition System Problems: Faulty spark plugs a malfunctioning ignition coil or issues with the ignition control module can disrupt the combustion process and result in engine stalls.
- Airflow Problems: An obstructed air intake a dirty or faulty mass airflow sensor or problems with the throttle body can affect the air-fuel mixture and lead to stalling.
- Engine Sensors Malfunctioning: Malfunctioning sensors, such as the crankshaft position sensor or the camshaft position sensor can disrupt engine timing and cause stalls.
- Idle Control Valve Issues: A malfunctioning idle air control valve can lead to irregular idle speed and engine stalls especially when the vehicle is at a stop.
If your engine is stalling it’s recommended to have a professional mechanic diagnose the issue. They can use diagnostic tools to identify the specific problem and perform necessary repairs to ensure the engine operates smoothly and reliably.
How to Diagnose a Coolant Temperature Sensor Issue?
Diagnosing a coolant temperature sensor issue is important for keeping your car running smoothly. First locate the sensor under the hood. It’s usually near the engine and connected to the coolant system. Check for any visible damage or loose connections.
Next use an OBD-II scanner to read the sensor’s data. Start the engine and monitor the coolant temperature readings. If the values are inconsistent or show extreme fluctuations the sensor might be faulty. Additionally check for signs of overheating such as steam or a high temperature gauge.
If you suspect a problem consult your vehicle’s manual for specific diagnostic procedures or seek professional help to replace the sensor if necessary. Regular checks help ensure your coolant temperature sensor is functioning properly and your engine stays in good condition.
How to Test Coolant Temp Sensor with Multimeter?

Testing a coolant temperature sensor with a multimeter is a straightforward process. Here’s a simple guide:
- Safety First: Before you begin, ensure the engine is turned off, and the key is out of the ignition. Let the engine cool down to avoid burns or injuries.
- Locate the Coolant Temperature Sensor: Identify the coolant temperature sensor in your vehicle. It is typically near the engine and connected to the coolant system. Refer to your car’s repair manual if needed.
- Disconnect the Sensor: Carefully disconnect the electrical connector from the coolant temperature sensor. Be gentle to avoid damaging the wires or connector.
- Set the Multimeter: Set your multimeter to the resistance (ohms) setting. This is usually represented by the omega symbol (Ω) on the multimeter.
- Test the Resistance: Place the multimeter probes on the terminals of the coolant temperature sensor. The resistance value should change as the sensor temperature changes. Refer to your vehicle’s specifications for the correct resistance values at various temperatures.
- Check for Consistency: Warm up the sensor by holding it in your hand or placing it in warm water. The resistance should decrease as the temperature increases. If the resistance values do not change or are outside the specified range the sensor may be faulty.
- Compare Readings: Compare the resistance readings with the values recommended by your vehicle’s manufacturer. If they don’t align it might be an indication that the coolant temperature sensor needs replacement.
Remember, if you’re unsure about the process or the readings it’s advisable to consult your vehicle’s repair manual or seek professional assistance. Regular testing helps ensure your coolant temperature sensor is functioning correctly contributing to the overall health of your engine.
How to Test Coolant Temp Sensor without Multimeter?
While using a multimeter is the most accurate method for testing a coolant temperature sensor you can perform a basic test without one. Here’s a simple method:
- Visual Inspection: Start by visually inspecting the coolant temperature sensor. Look for any obvious signs of damage corrosion or loose connections. If the sensor appears damaged it may need replacement.
- Check for Fault Codes: Use an OBD-II scanner to check for any diagnostic trouble codes related to the coolant temperature sensor. Modern vehicles are equipped with onboard diagnostics that can provide information about sensor malfunctions.
- Observe Dashboard Gauges: Start your vehicle and observe the temperature gauge on the dashboard. If the gauge remains at the extreme cold or hot end it could indicate a problem with the coolant temperature sensor. However keep in mind that this method is less precise than using a multimeter.
- Physical Feel Test: While the engine is running carefully touch the coolant temperature sensor. Be cautious not to burn yourself. The sensor should gradually warm up as the engine does. If it doesn’t there might be an issue. This method is less accurate and should be used cautiously to avoid burns.
- Compare Symptoms: Compare the observed symptoms such as poor fuel efficiency or engine performance issues with common signs of a faulty coolant temperature sensor. While not conclusive these symptoms can provide additional clues.
It’s important to note that while these methods can offer some insights they are not as accurate as using a multimeter. If you suspect a coolant temperature sensor issue and are unable to confirm it through these basic methods it’s advisable to consult a professional mechanic or use a multimeter for a more accurate diagnosis.
When Should I Replace My Coolant Temp Sensor?
A coolant temperature sensor can go bad due to various reasons. First exposure to extreme temperatures over time can lead to wear and tear. If the sensor is consistently exposed to high engine temperatures it may degrade and provide inaccurate readings.
The corrosion caused by coolant leaks or a low-quality coolant mix can contribute to sensor failure. The presence of contaminants in the coolant such as rust or debris can also damage the sensor over time.
Furthermore electrical issues can impact the sensor’s performance. A damaged wiring harness or faulty connectors can interfere with the sensor’s ability to send accurate signals to the engine control module.
Lastly manufacturing defects or general wear from extended use can also be factors leading to the failure of the coolant temperature sensor. Regular maintenance and monitoring can help prevent these issues and ensure the proper functioning of the sensor for optimal engine performance.
Electrical Problems
Electrical problems in a vehicle often stem from damaged wiring or corroded connectors. These issues disrupt the flow of electricity causing malfunctions in various components. A malfunctioning alternator can lead to a failing battery and difficulties starting the car.
The problems with fuses and relays can impact essential functions such as lights and power windows. Regular inspections and prompt replacement of faulty components are crucial to ensure reliable vehicle performance. Professional diagnostics may be necessary for complex electrical issues.
Physical Damage
Physical damage to a vehicle can result in various problems. Collisions or impacts can cause visible harm to the body affecting the structural integrity. Dents scratches or bent components not only impact the vehicle’s appearance but may also compromise its functionality.
In accidents critical systems such as the engine suspension or brakes can suffer damage leading to operational issues. Regular inspections and timely repairs are essential to address and prevent further complications arising from physical damage.
Professional assessment after accidents helps identify hidden issues and ensures the overall safety and performance of the vehicle.
Contamination
Contamination in a vehicle can cause significant issues. For instance contaminated fuel can harm the engine’s performance leading to issues like reduced fuel efficiency or engine misfires. In the brake system brake fluid contamination can compromise braking effectiveness and safety.
The contaminated oil in the engine can result in increased friction and wear on crucial components. Regular maintenance and using quality fluids are essential to prevent contamination related problems and ensure optimal vehicle performance.
Addressing contamination promptly can help avoid more extensive damage and costly repairs in the long run.
Wear and Tear
Wear and tear are natural processes that can impact a vehicle over time. Components like brake pads tires and belts can wear down with regular use affecting performance. Engine parts may also experience wear, leading to reduced efficiency and power.
Routine maintenance such as replacing worn-out components and fluids is crucial to mitigate the effects of wear and tear.
Ignoring these signs can result in more significant issues and costly repairs down the road. Regular inspections and proactive replacements help maintain the overall health and longevity of a vehicle.
Overheating
Overheating in a vehicle can occur due to various reasons. Insufficient coolant levels or a coolant leak can lead to inadequate heat regulation causing the engine to overheat. Malfunctions in the radiator or cooling fan can also contribute to overheating issues.
It is a faulty thermostat may fail to regulate the engine temperature properly. Regular coolant checks timely repairs and proper maintenance are essential to prevent overheating and avoid potential engine damage.
Monitoring temperature gauges and addressing issues promptly can help ensure the vehicle runs smoothly and avoids overheating-related complications.
Incorrect Installation
Incorrect installation of vehicle components can lead to significant problems. For instance improperly installed brake pads or rotors may result in inefficient braking and compromised safety. Similarly an incorrectly installed timing belt can lead to engine misalignment and potential damage.
Incorrectly installed electrical components can cause malfunctions and electrical issues. Precision during installation is crucial to ensure proper functionality and prevent avoidable problems.
Professional installation or following manufacturer guidelines can help avoid complications arising from incorrect installation and maintain the overall reliability of the vehicle.
Exposure to Chemicals
Exposure to chemicals can adversely affect a vehicle’s components. For instance corrosive substances like road salts or harsh cleaning agents can lead to rust and corrosion on the vehicle’s body and undercarriage. Battery terminals may corrode when exposed to battery acid.
Moreover contact with certain chemicals such as oil or coolant leaks can damage rubber seals and hoses impacting the engine’s performance.
Regular cleaning and prompt addressing of chemical exposure can help prevent deterioration and maintain the longevity of vehicle components. Protective measures such as undercoating and proper storage can further reduce the risk of chemical-related damage.
Manufacturing Defects
Manufacturing defects can cause issues in vehicles right from the start. Faulty components produced during manufacturing can lead to malfunctions and unexpected problems. Common examples include engine parts with imperfections electrical system issues due to wiring errors or defects in critical safety features.
These defects can compromise the vehicle’s performance safety and reliability. Regular quality control measures and recalls by manufacturers help address and rectify potential issues related to manufacturing defects. It’s crucial for vehicle owners to stay informed about recalls and promptly address any identified defects to ensure the proper functioning of their vehicles.
How to Reset Coolant Temp Sensor?
These are some methods to reset coolant temp sensor.
Method 1: Clear the fault code with an OBD-II scanner
1. Locate the OBD-II diagnostic port
Find the OBD-II diagnostic port in your vehicle usually located under the dashboard or in the center console area.
2. Connect the OBD-II scanner
Plug the OBD-II scanner into the diagnostic port of your car.
3. Ignition on but engine off
Turn on the ignition without starting the engine. This will power up the scanner and enable it to communicate with your car’s computer.
4. Scan for fault codes
Use the OBD-II scanner to scan your car’s computer for any fault codes specifically related to the coolant temperature sensor.
5. Clear the fault code
If the scanner detects a fault code for the coolant temp sensor follow the prompts on the scanner’s interface to clear the code from the car’s computer.
6. Turn off the ignition and disconnect the scanner
After clearing the fault code, turn off the ignition and disconnect the OBD-II scanner from the diagnostic port.
Method 2: Disconnect the sensor for a few minutes
1. Engine off and cooled down
Ensure that the engine is completely turned off and has cooled down before proceeding.
2. Locate the coolant temperature sensor
Refer to your car’s owner’s manual to locate the coolant temperature sensor in your specific vehicle.
3. Disconnect the electrical connector
Carefully disconnect the electrical connector that is attached to the coolant temp sensor. This will interrupt the sensor’s connection to the car’s electrical system.
4. Wait for a few minutes
Allow a few minutes for any residual electrical charges to dissipate and to clear temporary data stored in the car’s system.
5. Reconnect the electrical connector
After the waiting period securely reconnect the electrical connector to the coolant temperature sensor.
6. Start the engine and monitor the temperature gauge
Start the engine and observe the temperature gauge on your car’s dashboard. The coolant temp sensor should recalibrate itself and provide accurate readings once again.
Selecting the appropriate method
The most suitable method for resetting a coolant temperature sensor will depend on the specific make and model of your vehicle. Some cars have built-in procedures to reset fault codes related to the coolant temp sensor while others necessitate the use of an OBD-II scanner. To determine the recommended method for your vehicle consult your car’s owner’s manual or seek professional advice.
How to Fix Coolant Temp Sensor?
If your car’s coolant temperature sensor is acting up here’s a simple guide to help you fix it. First locate the sensor usually found near the engine’s thermostat housing or on the cylinder head. Make sure the engine is cool before starting.
To replace the sensor disconnect the battery to ensure safety. Then disconnect the electrical connector attached to the sensor and use the appropriate tool to remove it.
Replace it with a new sensor ensuring it’s the right model for your vehicle. Finally reconnect the electrical connector reattach the battery and start your car to check if the issue is resolved.
Remember to consult your vehicle’s manual for specific instructions and if you’re uncertain seek professional assistance. Keeping your coolant temperature sensor in good condition helps your engine operate efficiently and prevents potential overheating issues.
When Should I Replace My Coolant Temp Sensor?
If your car’s engine temperature gauge acts erratically or shows unusual readings it might be time to replace the coolant temperature sensor. This sensor helps regulate the engine temperature by sending signals to the car’s computer.
Over time the sensor can wear out leading to inaccurate readings. If you notice frequent overheating or your check engine light comes on it’s a good idea to check the coolant temperature sensor.
If your vehicle struggles with starting or experiences poor fuel efficiency the sensor could be a culprit. Regular maintenance checks and prompt replacement when needed can help ensure your engine runs smoothly and efficiently.
How to Replace an Engine Coolant Temperature Sensor?
To replace an engine coolant temperature sensor start by locating it on the engine. Usually it’s near the thermostat housing or on the cylinder head. Ensure the engine is cool before beginning. Disconnect the negative battery terminal to ensure safety. Gently unplug the electrical connector attached to the sensor.
Use the appropriate tool like a wrench or socket to carefully remove the old sensor. Be cautious of any coolant leakage. Before installing the new sensor apply a small amount of thread sealant to the threads. Tighten the new sensor snugly but avoid overtightening.
Reconnect the electrical connector and the negative battery terminal. Finally refill the coolant if any was lost during the process and start the engine to check for any leaks.
FAQ’s
What is a Coolant Temp Sensor and why reset it?
The Coolant Temp Sensor monitors engine temperature and resetting it helps maintain accurate readings for optimal performance.
Can I reset the Coolant Temp Sensor on my own?
Yes, it’s often a DIY task requiring no special tools and you can follow simple steps to recalibrate the sensor.
Signs my Coolant Temp Sensor needs a reset?
If your engine runs hot or cold unexpectedly resetting the sensor can address these irregularities.
Are there different methods for resetting?
Yes, methods vary, but most involve disconnecting the battery or using onboard diagnostics to reset the Coolant Temp Sensor.
How often should I reset the Coolant Temp Sensor?
Resetting annually or if you notice performance issues helps ensure accurate temperature readings and optimal engine function.
Does resetting improve fuel efficiency?
Yes, a properly calibrated sensor can contribute to better fuel efficiency and overall engine performance.
What are the risks of not resetting?
Ignoring resets may lead to inaccurate temperature readings, potentially causing engine damage or reduced efficiency over time.
Can I reset without special tools?
Yes, you can typically reset the Coolant Temp Sensor using basic tools commonly found in a car owner’s toolkit.
Role of Coolant Temp Sensor in preventing overheating?
The sensor plays a crucial role in preventing engine overheating by providing real-time temperature data for timely cooling system activation.
Can a malfunctioning sensor give false readings?
Yes, a malfunctioning sensor can provide inaccurate temperature readings affecting engine performance and potentially causing damage.
Impact on other vehicle systems?
Resetting the Coolant Temp Sensor usually focuses on its calibration and doesn’t significantly impact other vehicle systems.
Where to find online guides for resetting?
Reliable online resources and car maintenance websites offer step-by-step guides for resetting the Coolant Temp Sensor.
Final Thoughts
In this easy guide we’ve provided straightforward steps on how to reset your coolant temperature sensor. Wondering How to Reset Coolant Temp Sensor? Well it’s a simple process that can help resolve issues with your vehicle’s temperature readings.
To begin locate the coolant temperature sensor in your car’s engine bay. Gently disconnect the sensor and wait for a few minutes. Next reconnect the sensor and start your vehicle. Follow your car’s manual to find the specific steps for resetting the sensor on your make and model.
By following our step-by-step instructions, you can quickly troubleshoot any temperature sensor problems. Regularly resetting your coolant temp sensor ensures accurate temperature readings and contributes to the overall health of your vehicle. Keep your engine running smoothly with this straightforward solution.

Hey there! I have 5 years of experienced repairing all makes and models. Specializes in engine diagnostics, brake repair, electrical systems, and teaching DIY maintenance tips. Passionate about keeping cars running safely.